Abstract Wallpaper

Posted by FOXY On 07 - 23 - 2009

Any picture can certainly lead to another picture using Adobe Photoshop. That I'll try in the following tutorial and the result is amazing. I recommend this simple tutorial to beginners and the most advanced. Of course you can add any effect, any element, text and also you can change the colors.

Bubbles Background

Posted by FOXY On 07 - 15 - 2009

With this tutorial we will learn to create a colored bubbles effect. We will create a cool background using the Brushe and the Gradient Tool. You can do different mixes with your favorite colors and the result is an explosion of color and energy.

Colored rays effect

Posted by FOXY On 06 - 16 - 2009

Now you can make your own colored light Wallpaper in 12 steps in Adobe Photoshop. You can create rays that brings to life any ordinary photography and also gives a halo effect. Through this tutorial you will learn how to use alpha channel and how to manage the light/dark areas.

Make brushes

Posted by FOXY On 06 - 29 - 2009

Perhaps, many times you have used a lot of downloaded brushes from different sites. Now you can create your own brush with different tools in photoshop. Everything you need is imagination and the following tutorial. Good luck!

Cold Effect

Posted by Foxy On 06 - 12- 2009

This Photoshop tutorial contains just 6 steps and the result is an interesting color effect proper for any photo. You will learn to manage the curves/hue/gradient map layers and you can create your own photo effect if you modify the values of the created layers.

Shinny Buttons

Posted by Foxy On 06-09-2009

In this Photoshop Tutorial you will learn how to make a nice and shinny button. You can change the colors or the settings of the layer so you can obtain your own buttons.

Change your hair color.

Posted by Foxy On 06-09-2009

Have you ever thought how you will look with your hair blue/pink/green? Now you can find out how to make this change in just 8 Steps in Adobe Photoshop. Tips: This Photoshop tutorial is proper for light hair color. To obtain different colors, what you have to do is playing with the values of hue/saturation command

Light Vision Text

Posted by Foxy On 05 -12-2009

In this photoshop tutorial you will learn in 13 steps how to decorate your text with a cool light effect. For this tutorial I used Adobe Photoshop 7.0. For any questions you can leave a comment and in 24 hours i will reply.

Create shinny web 2.0 button

Publicat de ps-fan On 04:26 Delicious Delicious DiggIt! submit to reddit


In this Photoshop Tutorial you will learn how to make a nice web 2.0 button. You can change the colors or the settings of the layer so you can obtain your own buttons .


Step 1: Open a new document (500x500 px.).

Step 2: Select the Gradient Tool and set your foreground colour to #353535 and your background colour to #151515 and fill the page.


Step 3: Select the Rounded Rectangle Tool and from Rounded Rectangle Options set the Proportional Values to 60 /20 and now you will draw an automatic shape. Next you will right click on image and select Make Selection.


Step 4: Create a new layer(layer>new>layer).

Step 5: Now fill the selection with a linear gradient (using the Gradient Tool) using the colors #57AD40 and #015F4A.

Step 6: And now we will give some layer effects for a nice and shinny look.

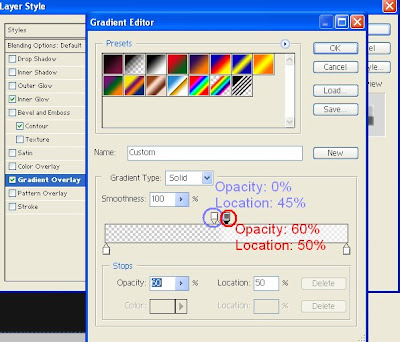
Layer > Layer Styles > Inner Glow.


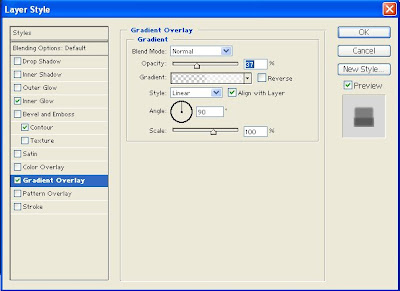
Layer > Layer Styles > Gradient Overlay.


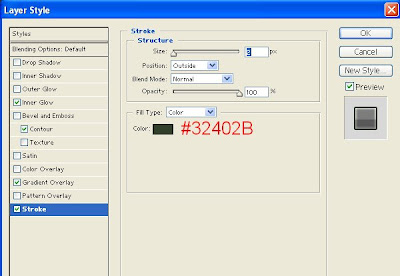
Layer > Layer Styles > Stroke.


...and your button should look something like this:


Step 7: Next up, we’ll be adding some lighter and darker areas on the button. Select the Burn Tool and set a soft 45 pixel brush, Midtones range and a 30% exposure. Click around the sides of the button. Then select the Dodge Tool; here I’ve used a 14 pixel soft brush, Midtones range again and an exposure of 10%. Click around the bottom this time.

Now you can multiplicate the layer and add some text :


0 Response to "Create shinny web 2.0 button"

Trimiteți un comentariu