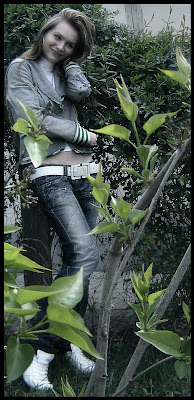
Abstract Wallpaper

Posted by FOXY On 07 - 23 - 2009

Any picture can certainly lead to another picture using Adobe Photoshop. That I'll try in the following tutorial and the result is amazing. I recommend this simple tutorial to beginners and the most advanced. Of course you can add any effect, any element, text and also you can change the colors.

Bubbles Background

Posted by FOXY On 07 - 15 - 2009

With this tutorial we will learn to create a colored bubbles effect. We will create a cool background using the Brushe and the Gradient Tool. You can do different mixes with your favorite colors and the result is an explosion of color and energy.

Colored rays effect

Posted by FOXY On 06 - 16 - 2009

Now you can make your own colored light Wallpaper in 12 steps in Adobe Photoshop. You can create rays that brings to life any ordinary photography and also gives a halo effect. Through this tutorial you will learn how to use alpha channel and how to manage the light/dark areas.

Make brushes

Posted by FOXY On 06 - 29 - 2009

Perhaps, many times you have used a lot of downloaded brushes from different sites. Now you can create your own brush with different tools in photoshop. Everything you need is imagination and the following tutorial. Good luck!

Cold Effect

Posted by Foxy On 06 - 12- 2009

This Photoshop tutorial contains just 6 steps and the result is an interesting color effect proper for any photo. You will learn to manage the curves/hue/gradient map layers and you can create your own photo effect if you modify the values of the created layers.

Shinny Buttons

Posted by Foxy On 06-09-2009

In this Photoshop Tutorial you will learn how to make a nice and shinny button. You can change the colors or the settings of the layer so you can obtain your own buttons.

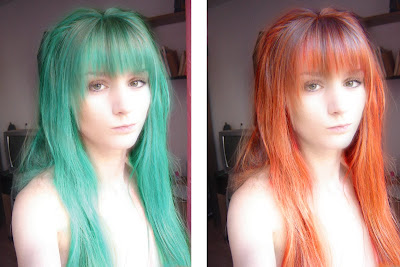
Change your hair color.

Posted by Foxy On 06-09-2009

Have you ever thought how you will look with your hair blue/pink/green? Now you can find out how to make this change in just 8 Steps in Adobe Photoshop. Tips: This Photoshop tutorial is proper for light hair color. To obtain different colors, what you have to do is playing with the values of hue/saturation command

Light Vision Text

Posted by Foxy On 05 -12-2009

In this photoshop tutorial you will learn in 13 steps how to decorate your text with a cool light effect. For this tutorial I used Adobe Photoshop 7.0. For any questions you can leave a comment and in 24 hours i will reply.

Se afișează postările cu eticheta Photo Edit. Afișați toate postările

3D Photography

Publicat de ps-fan On 05:30 0 comentarii Delicious Delicious DiggIt! submit to reddit


In this tutorial you will learn how to turn an ordinary picture into a cool and interesting picture. If you follow the steps you get a 3D effect that will emphasize any picture. For this tutorial I used Adobe Photoshop CS2.


Step 1: Open a photo:


Step 2: Select rectangualar Marquee Tool and select the subject.


Step 3: Next up we'll have to give some perspective effect to the selected area. So, right click on the image and select Transform Selection and right click again on the image and select Perspective. Drag the corners of the photo to give the perspective effect that you want but don't forget that the head must be outside of the selection.


Step 4: Now copy the selected area and open a new file with double width and height (for example if my photo's width is 632 px. now will be 1264 px.) and fill it with grey(#dadada). Now you can paste the selected area.


Step 5: Now go to the first image and set selection>inverse and copy and paste on the second photo.


Step 5: And we have a new layer which has to be toggled exactly like the primary photo and thereafter set the layer 2 opacity to about 70 % so we can see the difference between the 2 layers.


Step 6: Now we have to select with the Pen Tool the head which is outside the "3D area"(Layer 1). Inverse the selection(Select>Blogger) and press delete to erase the areas that I don't need.


Step 7: Ctrl +click on Layer 1m go to select>modify>expand >10 px. Then right click on the image and select Make Work Path. Then with a 10 px. white square brush stroke the path. And for a strong perspective effect you can add some shadow to layer 1.


Step 8: Now you can set the opacity of the layer 2 to 100%.


Colored Rays Effect

Publicat de ps-fan On 02:31 0 comentarii Delicious Delicious DiggIt! submit to reddit
Now you can make your own colored light Wallpaper in 12 steps in Adobe Photoshop. You can create rays that brings to life any ordinary photography and also gives a halo effect. Through this tutorial you will learn how to use alpha channel and how to manage the light/dark areas.


Step 1: Open a photo:


Step 2: Go to Channels and ctrl+click the RGB mode.


Step 3: Create a new Alpha Channel and you'll obtain a black image but the selection presists.


Step 4: Set the foregorund color to black and the background to white and press ctrl + backspace. This command reveals the details of the photo.


Step 5: Now we will inverse the selection (select>inverse) and set the foregorund color to white and the background to black and again press ctrl + backspace darking a little bit the selected areas.


Step 6 : Again you'll have to inverse the selection and the same inverse the background(from white to black) and the forenground (from black to white). Press ctrl + backspace three times to light the photo.


Step 7: Go to image>adjustments>levels and push the dark side to about 42.


Step 8: Set the foreground to white and with a 65 px. soft brush remove the areas that you don't necessary need.


Step 9 : Next up , you'll have to invert the image (ctrl+i).


Step 10: Now, go back to to Layers and create a new layer and fill it with white.


Step 11: Go to select>load selection and change the channel to Alpha 1:


Step 12: Now fill the selection but first lock the layer's transparency. Select the gradient Tool and from Gradient Editor change the Gradient Type to nosie. Pressing the Randomize Button you'll obtain a different color mix every time. After you have decided press Ok and fill the page.(The selection must be active).


Final Photo:


Change your hair color.

Publicat de ps-fan On 06:03 0 comentarii Delicious Delicious DiggIt! submit to reddit

Have you ever thought how you will look with your hair blue/pink/green? Now you can find out how to make this change in just 8 Steps in Adobe Photoshop.


Tips: This Photoshop tutorial is proper for light hair color. To obtain different colors, what you have to do is playing with the values of hue/saturation command


Step 1: Open the photo.

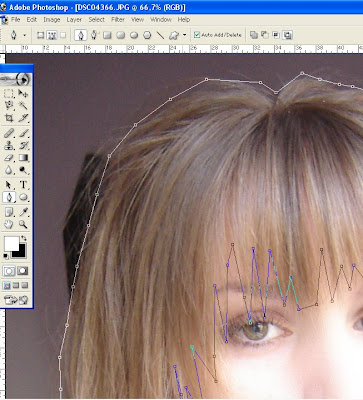
Step 2: Select pen tool and select the hair.


Step 3: Select Convert Point Tool and modify the corners.


Step 4: To make a selection Right click on photo> Make selection.
To modify the Feather of the selection select Rectangular Marquee Tool then right click on image and select Feather>5 px. (My photo has 1600x2300 px.; adjust the feather value proportional with the dimensions of your photo).

Step 5: Press ctrl+c ->ctrl+v to copy the selected area.

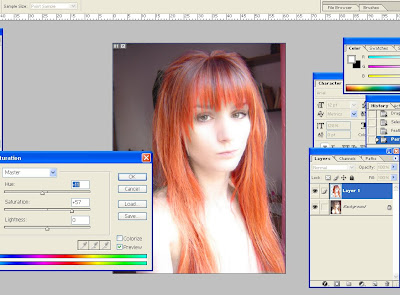
Step 6: Select the new layer; go to image-> adjustments>hue/saturation and play with the values.


Step 7: Select the Brush (30 px) to soft light mode and 20 % opacity and retouch the areas. The same thing you should do with the Eraser Tool with a low opacity (round about 14-30 %) (ALL THE MODIFIES ARE ONLY ON THE LAYER 1!!), then you can use the Dodge Tool/Burn Tool to retouch the light/shadow areas.

Step 8: Ctrl+c on the Layer 1 then go to select>inverse; then go to select>modify>expand and give 2 px. For a soft effect select Filter>Blur>Gaussian Blur and set to 8,6 px.

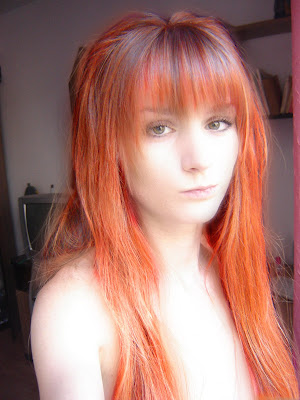
Final Photo:

Cold Effect

Publicat de ps-fan On 12:46 0 comentarii Delicious Delicious DiggIt! submit to reddit
This Photoshop tutorial contains just 6 steps and the result is an interesting color effect proper for any photo. You will learn to manage the curves/hue/gradient map layers and you can create your own photo effect if you modify the values of the created layers.

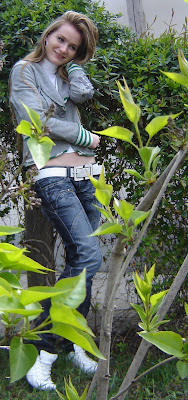
Step 1: Open the photo which you want to edit.


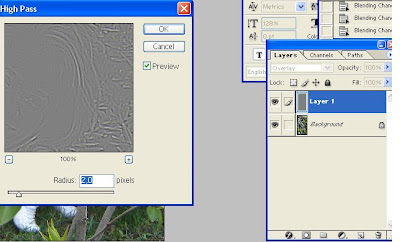
Step2: 1. Duplicate the backgorund and select the layer duplicated, then go to Filter > Other > High Pass and apply at 2.0 pixels then change the Blend mode to Overlay.


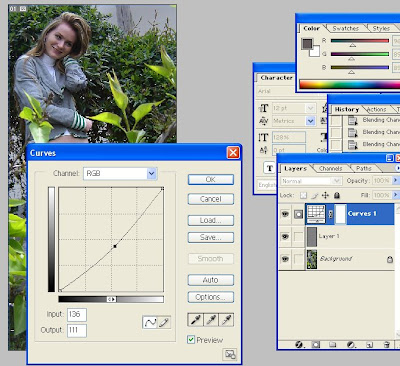
Step 3: Add a curves Adjustment Layer(Layer>New adjustment layer>Curves) to modify the contrast.


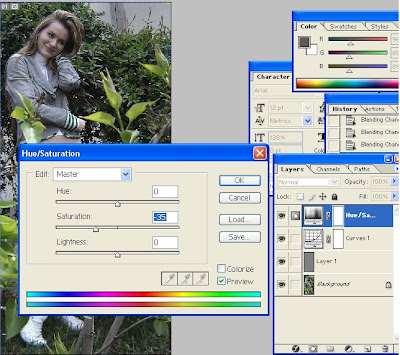
Step 4: Add a Hue/Saturation Adjustment Layer(Layer>New adjustment layer>Hue/Saturation) to reduce saturation at -35.


Step 5: Add a Gradient Map Adjustment Layer (Layer>New adjustment layer>Gradient Map) to apply blue color tones. Set the blend mode of the layer to Color and set the opacity to 24%


Step 6: Make a black border with square brush (32 px.)(keeping pressed Shift you will get a right line)
Step 7: With the Burn tool dark the shadow areas and with the Dodge tool light "white" areas.